Saturday, May 31, 2014

Palos Verdes Antique Show & Sale

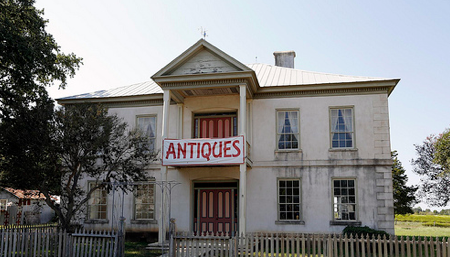
Today we thought we would check out the 46th Annual Palos Verdes Antique Show & Sale. It's a quant little show held at the St. Francis Episcopal Church in Palos Verdes Estates, CA. The show runs thoughout the beautiful church grounds surrounded by very tall Eucalptus trees and lush garden. I felt like I was at a mission!
www.stfrancispalosverdes.org
Lots of friendly people with great information and ready to sell you your next object of desire.
 Lots of sterling silver from England from very knowledgable vendors and some very nice pieces of furniture, sorry forgot to take that picture!
 I have a 'thing' for silver salt and pepper shakers.  Just loved these from England!
 In addition to the Antiques booths, the show had an Antique Appraisals booth. So if you brought that certain cherished item that was from your great grandma's attic you'd have an opportunity to find out it's value! 
The Palos Verdes Antiques Show & Sale is located right on the coast so it didn't hurt to have a beautiful view of the ocean while shopping and enjoying a little English Afternoon Tea on the patio!
All proceeds from the show sale support the Mission & Outreach of St Francis Church. 
So if you didn't make it this year perhaps mark your calendar for next year to attend this afternoon escape by the sea!


Monday, March 24, 2014

Texas Antique Week!

In a few days my husband and I will be off to another adventure. This time, to my beloved state of TEXAS. It's been way too long and long over due since I've been back to my home state but alas...this won't be one of those lay by the pool holding a PiƱa Colada with small umbrella, or asking a concierge for advise on dinner reservations or where to get a couples massage trip.

Nope!

That's 'cause we'll be staying in a hotel in the middle of nowhere: Balstrop (forgive me), getting up with the roosters, sweating it out, walking all day, sun hats on, lots of sunblock, lots of water bottles and pushing a cart or something with wheels 'cause we all know CASH IS KING when it comes to shopping for vintage, antique and junk collectibles!

Texas Antique Week we're comin'!

Twice a year in the middle of Round Top, Texas pop 77+, located in Fayette County, half way between Austin and Houston thousands (I was told 20K) of people flock to this area to shop for antique and vintage finds hoping to find that special something. It's an event spread over two weeks. This year it's March 22 thru April 6 and September 20 thru Oct 5.

Round Top Antique Week began over 30 years ago in the Round Top Association Hall, when Miss Emma Lee Turney and her company, Antiques Productions were asked to do an Antique Show in a little German town that was quietly being restored, Round Top, Texas.

The show quickly became a social event for Houston socialites as they retreated to charming Round Top every Spring and Fall.  The show was still small but it was the cream of the crop in quality dealers, and had the leaders and financiers of Houston buzzing.  The fresh air and country-style shopping gave the society folk a chance to let down their guard and pick for their beautiful homes.


Round Top is no longer ONE SHOW.  Over the years it has become a 10 day event featuring 1000s of merchants spread out over five small towns: Round Top, Warrenton, Carmine, Shelby and Fayetteville.   The Round Top Register guessed at one time that there are now about 35 separate shows with at least 2,500 dealers.  Not to mention the surrounding fields, warehouses, and tents covering cow pastures and black tops… Miles and miles of shopping, picking and wheeling and dealing!


Folks come from all over with theire RVs, Campers, U-hauls and trucks. Hotels & motels book up. We learned the hard way as this was an impromptu last minute decision, and struggled finding a place. Highly recommend you plan way ahead for next year if you want a room close to the event.

Expect traffic and long lines!

Lots of picking & antiquing!

There's something for everyone!

Make sure to measure your walls or area for that special "je ne sais quoi" for that you'll know when-you-see-it you're gonna buy.

Before and after at Marburger Farm, is a must see venue.

Lots of eye candy.

Need a phone booth? They've got one!

Get started on your English garden!

Don't forget your hat!

Or sunblock, lots of fun in the sun!

Miles and miles of shopping, picking, antiquing! Shop till you drop - open late!


For more information please check out these websites:

www.antiqueweekend.com
http://www.roundtoptexasantiques.com/
http://showdaily.us/
http://www.cactuscreekdaily.com/news/round-top-guide
http://www.flickr.com/photos/antiqueweekend/

Happy hunting y'all!
Monday, April 8, 2013

Robin's Egg Cake!


HAPPY SPRING!

Every Easter holiday friends and family of ours gather round the dining table as we serve up the traditional Easter meal. This year keeping close to the Spring theme I decided to create a Robin's Egg cake with nest and all!  Here's how I went about it. 

You will need:

Your favorite cake mix.
Egg baking mold (I got my from Wilton on Amazon.com)
4 cups buttercream frosting
Lt Blue and green food coloring dye to make Turquoise, or make your life easy and buy SKY BLUE by Wilton
5 oz Chow mein noodles
8 oz of chocolate, bittersweet or semisweet
1 very fine paint brush for 'speckling'
wax paper
microwaveable bowl for melting chocolate
1 cookie sheet


Buttercream Frosting

1-1/2 cups unsalted butter at room temperature
2 lbs confectioners sugar - sifted
1/4 teaspoon vanilla
2-3 tbsp whole milk
standing mixer

Using a stand mixer with the paddle attachment, mix butter and salt on medium until pale and smooth. Roughly 5  minutes. Scrape down the sides of the bowl. Add confectioners sugar, one cup at a time. Mixing on low after each addition. Scrape down sides on bowl as needed. Add vanilla and mix to combine. Add up to 2-3 tbsp of milk to reach the desired consistency of icing. Add a drop at a time of sky blue food coloring to create the Robin's Egg blue shade of frosting. Mix on low once more to blend and smooth. Makes about 4 cups.


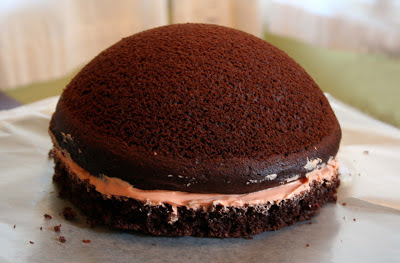
After you have baked your cake in each egg cake mold and assembled the egg cake by placing a layer of frosting in between you are now ready for frosting.  Carefully smooth over a thick layer of robin's egg color frosting on your cake. Chill so that the frosting hardens.

Creating the Nest

In a small heatproof and microwaveable bowl heat and melt the chocolate 30 seconds at a time until you reach a smooth, lump-free, liquid-like consistency. You will need the chocolate for 2 things: creating your 'nest' and speckling the egg cake. Once the chocolate is melted and ready pour a small amount into a  very small bowl, about 1 tbsp. This will be for speckling the cake. 


Place a sheet of wax paper on a cookie sheet. In a medium size bowl pour half of the chow mein noodles. Carfully pour/drizzle the heated chocolate over the chow mein noodles. With a large fork move and stir the noodles so that they are coated evenly, add more chow mein noodles if needed. Once all the chow mein noodles are coated pour onto the sheet of wax paper that is on the cookie sheet. It's OK if the noodles are clumped together or loose.  Place into your refrigerator to cool and harden for about half hour.

To create the speckled texture on the frosting I dipped the fine paint brush a little at a time into the melted chocolate and slowly added little dark brown flecks of 'paint'. Warning: this will take some time, be patient and get creative!  


HAPPY NESTING!


Tuesday, March 26, 2013

Confetti Eggs!


Talk about going back to my childhood in Texas! My sisters and I used to make these fun colored hollowed out eggs filled with confetti every Easter with my cousins. We'd all sit around the kitchen table and use our markers and decorate them. On Easter Sunday after church our parents would hide them in the backyard and off we went with our baskets in our Easter-Sunday-Best outfit looking for the plastic eggs and of course the good ol' confetti eggs...and when you least expected it WHAM!  Your sister or cousin smashed a confetti egg on your head! 

Good ol' all American Easter fun!

So this year I thought I would continue the tradition and ship some off to my niece and nephew back east. He he they don't know what's coming! Hope they can find them in the snow :) I heard Spring was delayed!

Here's how to make the eggs. You will need:

1  Easter Egg dye kit
1-2 dozen eggs
5 small bowls with water
Small bag of confetti
Round 1.5" Stickers or tape of your choice.
Newspaper 


With the end of a butter knife tap the end of each egg gently and make a small cut, shake the white and yolk out. It takes a bit of practice but if you are persistent it will work, or make the hole a little bigger, chip off a bit with your fingers. Rinse the egg out with cool water and place on newspaper. You will have many eggs cracked so I recommend you bake a cake and an omelette with the remains.

Place each dye tablet in small bowls filled with water.  Big enough to submerge an egg all the way. Do all this over a newspaper so that it will soak any water and help with the mess.


The egg shells will take about 5-10 mins to color, the longer you keep them in the dye solution the richer the color. After the eggs are dyed remove them and drain upside down, carefully placed in the egg carton. Allow to dry for about half hour or so. 


Place the dyed eggs upside down so all the fluid runs out and into the egg crate while drying.


Allow to dry for about half hour or so. You don't want to put confetti inside the egg when it's still wet. 


Gently add confetti to each egg, fill to about 1/3. OK I'm bad. I didn't have any confetti and I had to hurry up and mail them or they wouldn't arrive in time so I improvised and used shredded paper, yes my bank statements and credit card offers are in this years 'confetti' eggs. I guess I should have called this blog post "Shredded Paper Eggs" instead :)


You can seal the hole with beautiful round stickers about 1.5" or use tape, as I did and put little stickers on them. If you have kids have them decorate the eggs with markers, glitter, stickers etc. THIS kid likes them in solid colors, or maybe I just didn't have time to decorate! He he. 

Happy Hunting!!

Tuesday, January 8, 2013

Happy New Years!

The holidays are a blur now but I was busy in the kitchen, (and shopping) hence no time for blogging! Tried for the first time making Chocolate Sea Salt Caramels and Toasted Coconut Marshmellows. YUM! Was challenging learning the dos and don'ts with the candy thermometer and heating sugar for a very long time, but in the end if you follow directions it all works out, right!


These 'mellows are a great treat for the coconut lovers you know. 


Toasted Coconut Marshmellows

(recipe by my Guru: Ina Garten) 

Ingredients

  • 7 oz sweetened shredded coconut, toasted
  • 1 recipe Homemade Marshmellow batter, recipe follows
  • Confectioners' sugar

Toasted Coconut
Spread the sweetend shredded coconut onto a baking tray and toast in the oven for about 10 minutes at 350 degrees. The coconut will slowly started to turn light brown. Keep your eye on them, you don't want the coconut to burn!  Sprinkle half the toasted coconut in an 8 by 12-inch nonmetal pan. Set aside and begin the marshmellows.

Marshmallows

  • 3 packages unflavored gelatin
  • 1 1/2 cups granulated sugar
  • 1 cup light corn syrup
  • 1/4 teaspoon kosher salt
  • 1 tablespoon pure vanilla extract
  • Confectioners' sugar, for dusting

Directions


Combine the gelatin and 1/2 cup of cold water in the bowl of an electric mixer fitted with the whisk attachment and allow to sit while you make the syrup.
Meanwhile, combine the sugar, corn syrup, salt, and 1/2 cup water in a small saucepan and cook over medium heat until the sugar dissolves. Raise the heat to high and cook until the syrup reaches 240 degrees F on a candy thermometer. Remove from the heat.
With the mixer on low speed, slowly pour the sugar syrup into the dissolved gelatin. Put the mixer on high speed and whip until the mixture is very thick, about 15 minutes. Add the vanilla and mix thoroughly.

Final Assembly

 Pour in the marshmallow batter and smooth the top of the mixture with damp hands. Sprinkle on the remaining toasted coconut. Allow to dry uncovered at room temperature overnight. 
Remove the marshmallows from the pan and cut into squares. I used clean kitchen scissors as I found that using a knife was messy and impossible! Roll the sides of each piece carefully in confectioners' sugar. Store uncovered at room temperature. Enjoy!


Sea Salt Soft Chocolate Caramels
(recipe adapted from Jacques Torres)

Ingredients
1 cup sugar
1/2 cup light corn syrup
1 cup heavy cream, at room temperature
2 ounces bittersweet chocolate, finely chopped
1 tbsp unsalted butter


Directions
In a heavy-bottomed sauce pan, stir the sugar and corn syrup together until the sugar is completely moistened. Bring the mixture to a boil over medium heat and cook, without stirring, until it turns a very light caramel color, about 5 minutes. Remove from the heat and very slowly pour the cream into the hot sugar (be careful-it will bubble up) and stir to combine. Return the mixture to medium-low heat
and simmer, stirring occasionally, until a candy thermometer inserted in the pot reads 238 degrees F, about 12 to 15 minutes. 

Remove from the heat and whisk in the chocolate and butter until smooth. Pour the mixture into a greased 8-by-8 inch square baking dish. Allow to cool completely (at least 2 hours) sprinkle sea salt onto the chocolate before cutting into 1-inch squares. Wrap with wax paper cut into 3 x 3 inches. Enjoy!


Thursday, November 22, 2012

Happy Thanksgiving everyone!


Here's a little something for your pie hole!

I spent all day yesterday trying out a new recipe for Pecan Pie from Barefoot Contessa's latest cookbook - FoolProof! I went to her book signing recently and have my very own signed copy. Oh my! I thought it befitting to bake something from her book. The pie has a secret ingredient, Bourbon. Yum!

Everyone at Thanksgiving dinner tonight will be my guinea pigs :)  
Looks good, let's hope it tastes good! 

Today I am grateful for many things, good health, good job, a funny husband to plans on heading to Target at midnight for Black Friday and specially family and friends. I am also grateful that my sometimes unpredictable oven temperature worked great yesterday. Oh the small blessings!

Have a wonderful Thanksgiving! 


I promise to add the recipe later, gotta go get ready.

Tuesday, October 30, 2012

Halloween Cake - Stabbed!!

 Take a stab at doing this easy Halloween inspired cake!

You will need:
half "ball" cake mold (amazon.com)
plastic knife from your local Halloween store
rolling pin
2" orange ribbon
chocolate cake mix
powder sugar
round 9" cardboard 
white store bought frosting plus red & yellow food coloring
white Fondant (find at your local cake supply store or amazon.com)
cake stand

Bake chocolate cake per cake box instructions. When cake is cool cut a thin layer for the base. Place base of cake onto round cardboard. This will help you move the cake to the pedestal later.
Then carve out the 'guts' to create a small dome and frost. 

 For orange frosting add 3 drops of red food coloring and 2 drops of yellow to the white frosting.

Add the remaining 'dome' piece of cake over the frosted layers.


Frost the dome and set the cake aside. 
The frosting will act as a glue when the rolled Fondant is placed over.

On a smooth surface sprinkle powdered sugar and roll out the fondant using a rolling pin. 
Roll to a smooth 10" round flat shape.


Carefully and with lots of patience place your flat fondant over the frosted cake. Try not to tear the fondant as it tends to dry out. Smooth out the fondant with your fingers so it covers all the cake. 
Then with a knife carefully cut the edges to leave a clean edge.

Carefully move your cake onto the cake pedestal.

Tie the orange ribbon around the cake. 

Take the knife and 'stab' the cake. 
The blood was made with a few drops of red food coloring and powdered sugar. Drizzle over stabbed area.


Happy Halloween!

Now have your slice and eat it too!